Writing and planning a video
Some video assignments may simply require you to record a presentation or an action and then review it. For this type of task, a well-framed, well-exposed, stable shot and clear sound will help you look good.
Why are you making your video?
The most important thing to consider is the point of the video – why are you making it? Once you clarify this, you’ll be able to plan towards it.
Examples of things a video might be trying to achieve include:
- Recording an action for review
- Demonstrating how to do something
- Explaining how something works or what something is
- Entertaining or connecting with an audience
- Persuading an audience to do something
Presentation
Make sure your presentation is well-planned and well-rehearsed and that the recording is technically competent. This ensures the audience notice the presentation, not the video. If the point of your video is to record something for review then typically the performance being recorded delivers the story.
Demonstration
To demonstrate something, consider all the steps that need to be included and how you will show these to your audience. How can you make the demonstration as visually interesting and easy to understand as possible? Using close-up shots to show specific things can often be very helpful.
Explanation
If your goal is to explain something, who should do the explaining, and what do they need to say? Will you use an interviewee who knows about the subject, a presenter, a narrator, or some combination? Or will you use titles?
Make it visual
The other thing to remember when planning your story is that it needs to be visual. If there’s nothing to show then the video assignment you’re planning will not be very effective at engaging your audience. It’s boring to look at someone talking or text on the screen for more than a handful of seconds.
Scripting your video
Scripting is a video blueprint involves planning both language and visuals. As the writer, you are essentially the “architect” of what will be shot and recorded by the camera.
A video script is a chronological run-down of scenes, shots, action and dialogue specifying who is saying and doing what, and when they’re saying or doing it.
- put your message in the first 30 seconds
- find the right tone
- use humour wisely
- pace yourself
These are the characteristics of a good Script:
- Simple language
- Short, crisp sentences
- Conversational in nature
Language
The language part of your video is going to come from any combination of:
- interview
- narration
- presenter
- dialogue
- titles
Visuals
The visuals may be in the form of:
- A video that illustrates or add meaning to what a presenter, narrator or interviewee is saying
- Motion graphics, animations, screencasts, images etc
- An action that you follow, including either scripted dialogue (e.g. in drama) or unscripted reality (e.g. an in-class documentary)
Shooting on a mobile device
There’s no rulebook but here are some solid tips for shooting a simple, good-quality video with a mobile device:
1. Use a tripod

Attaching your device to a tripod will ensure your video is steady. You’ll need a tripod obviously – a small one suitable for a still camera will work fine. You’ll also need an attachment which will enable your device to connect to your tripod. These are not expensive and can be purchased from electronics stores.
2. Make sure your video is level
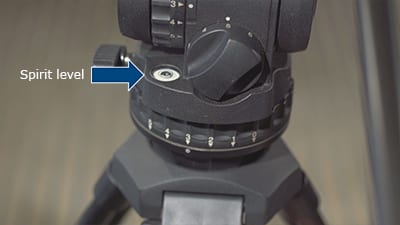
Generally, your video needs to be level. Checking what your image looks like and using your judgment is a perfectly adequate way to make sure your video is level. If what’s on your LED screen looks crooked, adjust the length of your tripod’s legs so what you’re about to record looks straight.
Your tripod may have a spirit level. If it does, make sure your device is level by getting the bubble into the middle of the circle.
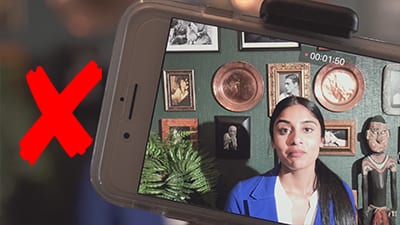
3. Make sure that everything you need to capture is included on your screen

If you’re recording a presentation from start to finish and your device is near the presenter, there is a good chance they may walk ‘off-screen’ which will feel awkward for your audience. The safest thing to do is to position the device at the back of the room, or at least a few rows back, and make sure that the whole space the presenter may walk into appears on your screen before you hit record.
4. Capture good sound!

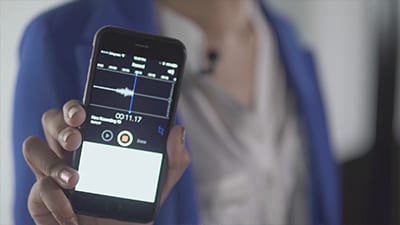
Capturing good sound is very important. Either put the device about a metre away from the speaker or presenter or put a recording device on them. Mobile phones can be used to record sound. Locate or download a dictation app and hit record, then drop it in the speaker’s pocket.
If you record using two devices (one for video and the other for sound), you’ll need to synchronise the two recordings, i.e. match the sound with the video, in your edit.
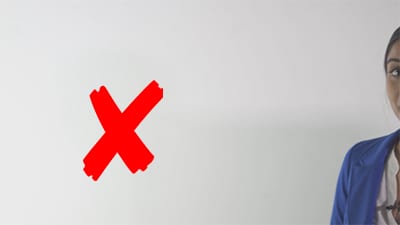
5. Check your lighting!


Make sure that anyone on screen is not backlit by a window and turned into a silhouette. This is a common mistake. The safest way around it is to put the window behind the camera so that the light falls onto the faces of the people you’re videoing.
If your shot looks grainy or dark, get more light to your device by opening curtains, switching lights on, or moving to a better-lit environment.
Tips for filming on a mobile phone
Put your phone into flight mode to avoid being disturbed with text messages or phone calls.
Clean the lens: Clean the lens with a microfibre cloth or other wipe for use with camera lenses; a cotton swab moistened with distilled water can also take off stubborn grime.
Your phone has a front and back camera, and the camera that faces towards you is lower quality. Don’t use the back camera, set it up so you can’t see the image.
Don’t shoot vertical videos, make sure that your phone is in landscape mode.
Don’t use digital zoom: it can be tempting to use the zoom feature on your smartphone to get a closer shot of your subject but since the lens isn’t zooming optically, you’re just enlarging the picture digitally. This results in one thing: pixels.
Videos take up a lot of space so make sure that you have enough memory on your phone.
Turn on your grid lines: turning on the grid lines in the setting.
Get your mobile video files off the device: you’ve recorded now you want to get the video files onto your computer to edit. The simplest option is to plug your phone into your computer. If you are using an Apple device, and have a Mac computer you also have the option to Airdrop. An additional solution is to have a cloud-based solution, for example, Google Drive or Dropbox.
Video editing
Editing is the process to tell the story of taking your raw video footage and combining it with other elements like music and graphics.
Here are some essential elements of editing:
Backed up footage
Google Drive is a cloud-based option for backing up your footage. Name the backed up footage with the identical names and file structure as the original footage.
Editing software for computer
You’re going to need a piece of software to edit the footage. Both iMovie and MS MovieMaker are good choices.
Apple:
iMovie is a video clip editing tool for iOS and macOS. It turns photos and videos into storytelling movies complete with a studio logo and credits roll. You can even start editing on iPhone or iPad, then finish on your Mac.
Windows:
MS MovieMaker
With Windows Movie Maker, you can quickly turn your photos and videos into polished movies. Add special effects, transitions, sound, and captions to help tell your story.
Mobile and online
Editing software for mobile devices
For Apple iOS
iMovie – also available on Mac computers. Very intuitive and user-friendly. You can cut the videos, arrange them on the timeline, add simple transitions.
Cameo– provided by Vimeo. Simple and intuitive to use, with simple editing features.
Adobe Premiere Clip – A simple editing tool combing videos, photos and music into a video, you can rearrange them and publish the project all from your mobile device.
Splice – an editor with more features to edit the video: trim, crop, effects, titles, speed controls, animation, transitions, music and more.
Other iOS editing apps: Top 10 Best video editors for iOS
For Android
FilmoraGo – A comprehensive video editing app, including adding effects, music, graphics, themes to videos and photos on your device.
Adobe Premiere Clip – A simple editing tool combing videos, photos and music into a video, you can rearrange them and publish the project all from your mobile device.
Other Android editing apps: 10 best video editor apps for Android.
If you have shot your video entirely on a mobile device, an online or mobile editing platform may well be the best option.
A Plan!
If you planned your video before you started shooting, you should have a clear idea about how all the parts are going to fit together. However, editing is highly creative and projects often change a bit during the process. This is fine, as long as the finished project makes sense and fulfils the criteria you began with.
Essential Editing Techniques
There are three essential editing techniques you need to make your video.
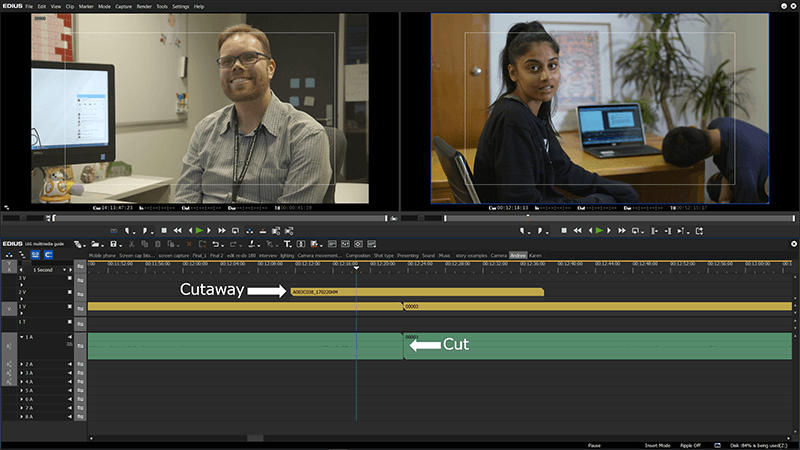
- The cut
A cut is an edit mark. The act of cutting is used to remove material which is not required in the edit. When editing, you usually create a cut by positioning your cursor on a clip (or your clip on the cursor on some mobile apps) and using a control key, mouse click or finger-gesture to ‘cut’ the clip at that point. This divides the clip into two sections. You can use this technique to remove material from the beginning or end of a shot. If you want to remove material from the middle of the shot, you create two cuts and delete what’s between them.

2. The cutaway
A cutaway a shot which is put over other footage to make the visual narrative more interesting, illustrate what’s being discussed or cover a jump cut. Cutaways are useful to make scenes in fiction filmmaking more dynamic and interesting. To illustrate what the person is talking about you can use cutaways to illustrate this.
In your editing software, a cutaway is usually placed in a second video track above the primary footage.
3. Continuity
A lot of videos don’t conform to the rules of Hollywood continuity, and they don’t need to. However, your video does need to make sense to your audience and look as good as it can.
Some tips:
- Choose a variety of shot sizes in each scene or sequence to avoid jump cuts and awkward cuts. Use the best shot you can – if there’s a shot with better performance, better focus or better exposure than the other ones available, use it. Make sure you supply enough visual information for your video to make sense.
Feedback
As you edit, choose moments to get feedback on whether what you’re doing makes sense. Editors become too close to their work to tell how an audience will respond. If you’re working on a project in a group and there’s only one editor, arrange to screen it to the group and get their feedback. Otherwise ask classmates, friends or people in your intended audience.
Music
It’s a good idea to identify a piece of music you like near the beginning of your edit so you can cut your video to it. This doesn’t mean always cutting on the beat (although you can in places if you like). Music contributes to mood or tone and pace during your edit and will help you keep both consistent.
Graphics
Graphics and motion-graphics are now very sophisticated, and post-production software for both has become much more accessible. However, most video assignments will not require or assume complex graphics.
Make sure it’s easy to read your graphics – they should be:
- Contrast the colour of the graphic to the video under it. Choose a dark or light outline or use a monotone background if the video in the shot where they appear is very busy.
- Simple. Keep the words to a minimum and make sure any animations are relevant and elegant.
Fine-cutting and finishing
Once you’re happy with the edits you’ve made and all the other elements, you should make sure that your sound-levels are the same throughout the video, and that any music you’re using is not drowning out your on-screen subjects or characters.
You should also correct the colour and exposure of your shots so that the video matches as it plays down. No one shot should be significantly darker or differently coloured to the shots either side. When you’ve polished your project as much as possible, it’s time to export.
Sharing your videos online
There are a few ways to share your video, by publishing them onto some online platform, such as Youtube or Vimeo. Both of them have been integrated with Canvas.
Youtube
Youtube – also provides a free captioning transcription service, but you do need to go over to check the transcription generated.
Tip: Upload your video as “unlisted”, so you can use it for your class but it won’t come up in the public search.
Vimeo
Vimeo – a great platform for sharing your video as it has fewer ads than YouTube. Basic (free) version allows up to 500Mb upload a week and 5Gb storage in total. With the basic version, you will have to upload your video for the public or put a password on it.
File format
Try to stick with MP4 or .MOV files as they are accepted by most platforms.
Vimeo supports most video format, including these common formats: .MP4, .MOV, .WMV, .AVI, and .FLV.
YouTube file supports these formats: .MOV .MPEG4 .MP4 .AVI .WMV .MPEGPS .FLV 3GPP WebM DNxHR ProRes CineForm HEVC (h265)